
TL;DR
A closet can serve as a cheap, compact vocal booth, but success depends on smart placement, effective acoustic treatment, and proper ventilation. Foam alone won’t soundproof — structure and sealing matter more.
Ever wondered if your closet could double as a vocal booth? The answer is yes — with some strategic tweaks. The key isn’t just slapping foam on the walls; it’s about understanding how sound works, how reflections bounce around, and how noise escapes. You can learn more about acoustic dampening and placement techniques.
This guide will show you practical ways to turn a cramped closet into a quiet, effective recording space. Whether you’re chasing studio-quality vocals or just want to block out the world, you’ll learn how to dampen reflections, place your mic for the best sound, and keep noise from sneaking out.
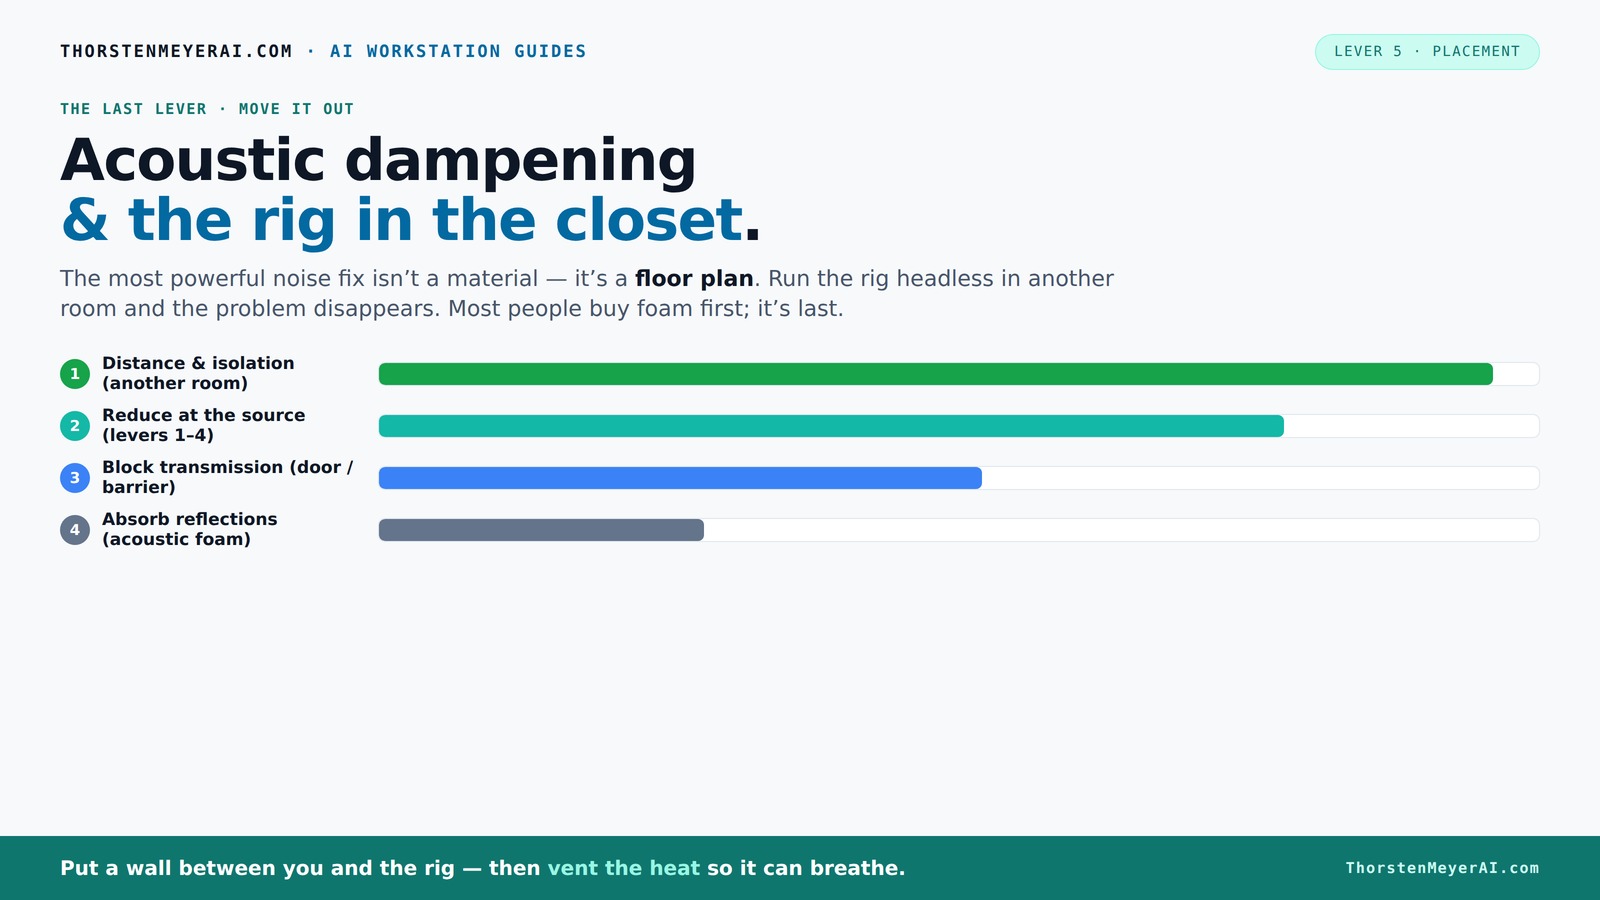
Acoustic dampening
& the rig in the closet.
The most powerful noise fix isn’t a material — it’s a floor plan. A rig you can’t hear because it’s in another room beats any amount of foam. Tap the approaches in Part 1 to see what actually works.
(another room)
(levers 1–4)
(door / barrier)
(acoustic foam)
Contain the noise, not the heat
Key Takeaways
- Sealing gaps and adding mass are more effective for soundproofing than foam alone.
- Place your mic at the right spot — about 6–12 inches away, angled to minimize reflections.
- Use reflection points to position panels and bass traps, especially in corners and above your head.
- Ventilation is critical — use ducted, quiet exhaust fans to prevent heat buildup without noise leaks.
- A closet can be a cheap, effective vocal booth if you treat reflections and seal leaks properly.

Focusound 52 Pack Acoustic Foam Panels 1" x 12" x 12" Sound Proof Foam Panles Soundproofing Noise Cancelling Wedge Panels for Home Office Recoding Studio with 300PCS Double-Side Adhesive
- Soundproofing Design: Triangular grooves for noise absorption
- Includes Adhesive Tape: 300pcs double-sided adhesive for easy installation
- Easy Shape Recovery: Soak in water to restore foam shape
As an affiliate, we earn on qualifying purchases.
As an affiliate, we earn on qualifying purchases.
Why a Closet Can Be a Game-Changer for Your Recordings
Closets are surprisingly good at isolating sound — if you set them up right. Thick clothes, clothing racks, and small enclosed spaces naturally diffuse sound waves, reducing echo and making recordings clearer. Plus, the tight walls prevent sound from bouncing all over.
Picture this: your closet is filled with hanging shirts and blankets. These act like a buffer, soaking up echoes and muffling background noise. As a result, your voice sounds warmer, less echoey, and more studio-like. But beware — this only works well if you manage sound leaks and placement.
For example, a musician in a tiny apartment turned her closet into a vocal booth by hanging thick blankets and sealing gaps around the door. The result? A noticeable drop in noise bleed and a much cleaner recording.
What Acoustic Dampening Really Means (And What It Doesn’t)
Acoustic dampening isn’t about eliminating all sound — it’s about controlling reflections and echo within a space. Foam panels, blankets, and rugs absorb the sound waves bouncing inside. But they do little to block noise from escaping or entering.
For instance, hanging egg-crate foam on the wall reduces echo, making your voice sound warmer. But if your door has gaps or your closet floor is thin, noise will leak out — foam won't stop that.
According to experts, good dampening reduces internal echo but isn’t the same as soundproofing, which requires sealing gaps, adding mass, or decoupling surfaces. Think of it like singing in a shower: sounds good inside, but the door and walls still leak noise.
Understanding this distinction is crucial because many people mistakenly believe foam panels alone will block external noise. In reality, achieving true soundproofing involves structural modifications, not just absorption. Recognizing these tradeoffs helps you set realistic expectations and prioritize improvements like sealing gaps or adding mass where it matters most.
Best Mic Placement in a Closet for Clear, Professional Sound
Where you put your mic makes more difference than most realize. The sweet spot? Place the mic about 6–12 inches from your mouth, slightly off-axis to reduce plosives. For more on optimal microphone placement, see fintech insights. Position it facing away from reflective surfaces like bare walls or closet doors.
Imagine your closet as a small box. The ideal setup: your mic is in the middle of the space, pointing at your mouth, with the back of the mic facing the closet wall or clothing rack. This minimizes reflections bouncing directly into the capsule.
For example, a YouTuber found that moving her mic from directly in front of her shirt rack to a corner about 8 inches away improved clarity and reduced echo. Small adjustments in placement can dramatically improve sound quality.
However, it’s important to understand that mic placement isn’t just about distance — it’s about positioning relative to reflective surfaces and your voice source. Experimenting with angles and distances can reveal the sweet spot that minimizes unwanted reflections and maximizes clarity, especially in confined, reflective spaces like closets.
Where to Put Acoustic Panels, Blankets, and Bass Traps for Best Results
Proper placement of acoustic treatment maximizes dampening. Focus on first reflection points — the spots where sound bounces directly from your source or mic to the walls. Learn more about acoustic treatment placement. Use a mirror to find these spots: when you see the mic in the mirror from your position, mark that wall.
Common spots include the wall behind your mic, the ceiling above, and the corners where bass tends to build up. Bass traps in the upper corners absorb low-frequency booms, especially in small, parallel-walled closets.
Strategic placement of treatment materials is essential because it directly influences how well your space absorbs and diffuses sound. Covering the right reflection points prevents sound waves from bouncing back into your mic, reducing echo and coloration. Bass traps in corners deal specifically with low-frequency buildup, which can muddy recordings if left unaddressed. Proper placement ensures you’re not wasting effort on areas that won’t impact your sound quality, thus making your treatment more effective and efficient.
How Much Coverage Do You Really Need? Covering Key Reflection Points
More isn't always better, but coverage is critical. Aim to treat at least 60-80% of the surfaces where sound can bounce back to your mic. For tips on improving your space, visit startups and business resources. Focus on the wall behind you, the ceiling, and the corners.
Small spaces benefit from thick panels (at least 2 inches) on the walls and ceiling. Rugs or carpets on the floor also help reduce reflections and echo, creating a warmer, less metallic sound.
Deciding how much treatment is enough depends on your specific space and goals. Over-treating can deaden your sound unnecessarily, while under-treating leaves too many reflections. A balanced approach involves identifying the main reflection points and treating those areas thoroughly, which can dramatically improve clarity without making the room sound overly dead. In small, reflective spaces, even a few well-placed panels can make a significant difference in achieving a professional sound quality.
DIY Tips to Improve Your Closet Without a Full Remodel
Want to boost your closet’s soundproofing without tearing down walls? Simple DIY tricks work wonders. Hang blankets or quilts on the door, line the walls with foam panels, and add a thick rug to the floor. For more DIY tips, see acoustic dampening ideas.
Use weatherstripping or acoustic sealant around gaps in the door frame to stop sound leaks. For a quick fix, place a bookshelf filled with books against the door to act as a barrier.
These low-cost modifications can significantly improve your space by reducing external noise and controlling internal reflections. The key is understanding that sealing gaps and adding mass are more effective than relying on foam alone. Combining these strategies allows you to create a more controlled environment that captures your voice better and minimizes outside interference. Remember, even small improvements can have a big impact on your recording quality and overall noise isolation.
What Foam Alone Won’t Do (And Why You Need More Than Just Panels)
Foam panels are great for reducing echo inside a small space but do little to block sound from escaping. If noise leaks through gaps, doors, or floors, foam won't fix it. You need sealing, mass, and decoupling.
For example, sealing the gaps around a closet door with weatherstripping cut noise significantly more than just adding foam inside.
Experts emphasize that true soundproofing involves structural modifications — adding mass to walls, decoupling surfaces, and sealing all openings. Foam is part of the picture but not the whole solution. Without addressing leaks and structural weaknesses, foam alone can give a false sense of security. The tradeoff is that you might think your space is well-treated when, in fact, outside noise still seeps in. Prioritizing sealing and structural improvements alongside absorption materials yields more noticeable results in noise reduction and overall sound isolation.
How to Ventilate a Closet Rig Without Sacrificing Silence
Ventilation is the biggest challenge in a sealed closet. You need airflow to keep your gear cool but don’t want noise to escape. The best solution? Use a quiet, ducted exhaust fan with sound dampening.
Imagine installing a small inline fan connected to flexible ducting, venting outside or into a separate space. Add acoustic lining around the vent to reduce noise transmission.
For example, a streamer installed a low-noise inline fan with ducting, keeping his rig cool while maintaining silence in his apartment. Proper ventilation prevents overheating and keeps your setup stable.
Choosing the right ventilation method involves balancing airflow needs with noise control. Quiet inline fans with insulated ducting and sound dampening materials help maintain a silent environment while ensuring your equipment doesn't overheat. Neglecting proper ventilation can lead to overheating, equipment failure, and increased noise from heat buildup, defeating the purpose of a quiet, controlled space.
Frequently Asked Questions
Can a closet really work as a vocal booth?
Yes, a closet can serve as a surprisingly effective vocal booth when you treat reflections, seal gaps, and add ventilation. It’s not perfect for loud or low-frequency sources, but it works well for most voice recordings.Where should I place the microphone in a closet?
Position the mic about 6–12 inches from your mouth, slightly off-axis, facing away from reflective surfaces. Place it in the middle of the space, pointing toward you, to minimize reflections and echo.Do foam panels soundproof a closet?
Foam panels reduce echo and internal reflections but do little to block outside noise. For true soundproofing, sealing gaps, adding mass, and decoupling surfaces are necessary.How do I stop sound from leaking through the closet door?
Seal gaps with weatherstripping and acoustic sealant. Hanging blankets or using a heavy curtain can also help block sound leaks. For better isolation, consider installing a solid core door or adding mass to the door frame.Is carpet or a rug enough on the floor?
A thick carpet or rug helps reduce floor reflections and echo, especially in small spaces. It’s a simple, effective way to improve sound quality and decrease ambient noise.Conclusion
Turning a closet into a recording space is about more than just slapping foam on the walls. It’s a careful dance of placement, sealing, and ventilation. When done right, even the smallest closet can produce studio-quality vocals and block out the world’s noise.
Remember: soundproofing and dampening aren’t the same. Focus on structure, not just absorption. In the end, a well-treated closet is a quiet, versatile, and budget-friendly solution — a tiny studio waiting to be unleashed.